Simple Easy Java Plugins to Make for Minecraft
![]()
Working on it...
This page is a work in progress, check back regularly for more than content!
Introduction
This rather large tutorial aims at getting you started with plugin development in Bukkit. Information technology is in no style a consummate tutorial of all possibilities in Bukkit, just rather a general overview of the basics. It starts with making certain y'all understand Java, sets up your workspace in an IDE, and introduces the essentials of near Bukkit plugins.
Videos
Learning Java
These tutorials crave basic knowledge of the Coffee programming language. If y'all are but getting started with Java or demand a refresher, the following is a non-exhaustive list.
Oracle'southward Java Tutorials - Official tutorials
Codecademy's Free Interactive Courses - Interactive Courses
Other Tutorials
- Java2s.com - Tutorials
- Coffee 101 - Tutorials
- JavaNotes - Gratis online textbook
- TheNewBoston - TheNewBoston's video tutorials
- Derek Banas - Faster paced Video tutorials
- MOOC.fi - A big course, designed to have nearly 12 weeks
Setting up an IDE
Before developing a plugin (or learning Java) you volition need to prepare a evolution environment. This includes simply is not limited to installing an IDE (Integrated Development Environment). The following tutorial contains instructions for the Eclipse IDE.
-
- For further information, encounter Setting Up Your Workspace
Y'all MUST download the Eclipse build for Java developers, Non the ane for Coffee EE developers. The version for Java EE developers does not transport Maven support, which is required for this tutorial.
Alternatively, you can utilize IntelliJ IDEA and follow this tutorial if you prefer JetBrains' IDE instead of Eclipse.
Starting a Plugin Projection
Create a Project
Earlier starting y'all'll demand to set your workspace and files in Eclipse. Starting time Eclipse, then create a new Project past selecting File -> New -> Project:

Now, open the Maven binder, and select Maven Project. Click side by side, and and so tick the Create a simple project box on the side by side page, and so click Next: If you can't see Maven folder, so you lot need to get download the m2eclipse plugin from here

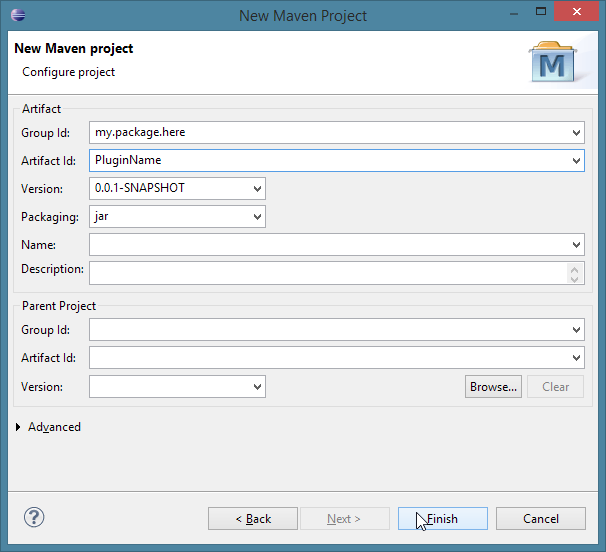
At present, you demand to name your group as follows:
- If you lot accept a domain name, the package would exist the domain name in reverse.
- Ex: i-am-a-bukkit-developer.com your parcel would exist com.i_am_a_bukkit_developer source
- Avoid using a domain you lot do not own.
- No domain? Here are some mutual conventions
- Create an account on a source command site such equally GitHub or sourceforge
- For GitHub, follow the instructions here and you volition have a sub-domain, so your parcel would exist io.github.<username>
- For GitHub, follow the instructions here and you volition have a sub-domain, so your parcel would exist io.github.<username>
- Use your email. Ex: <username>@gmail.com would be com.gmail.<username>
- This is used past many plugin developers. For this, utilize the Java package me.<name>
- This is the to the lowest degree preferred method. But use any unique group naming, once again, employ this equally your last resort.
- Create an account on a source command site such equally GitHub or sourceforge
In that location are several things that your group must not begin with and those are:
- org.bukkit
- net.bukkit
- com.bukkit
- net.minecraft
- com.mojang
Once you have the base group proper noun, yous will want to stop information technology off with the plugin name. Lets apply the GitHub Pages example for this. If you are creating a plugin chosen TestPlugin your full grouping name would be io.github.<username>, and your artifact proper name would be TestPlugin. For the version, simply stick with the default for now. Information technology can be changed after.
Finish the wizard:
If this is your start time using Eclipse, close the Welcome tab by clicking the "X" side by side to the Welcome tab on the tab bar. Now, you should have a window that looks similar this:
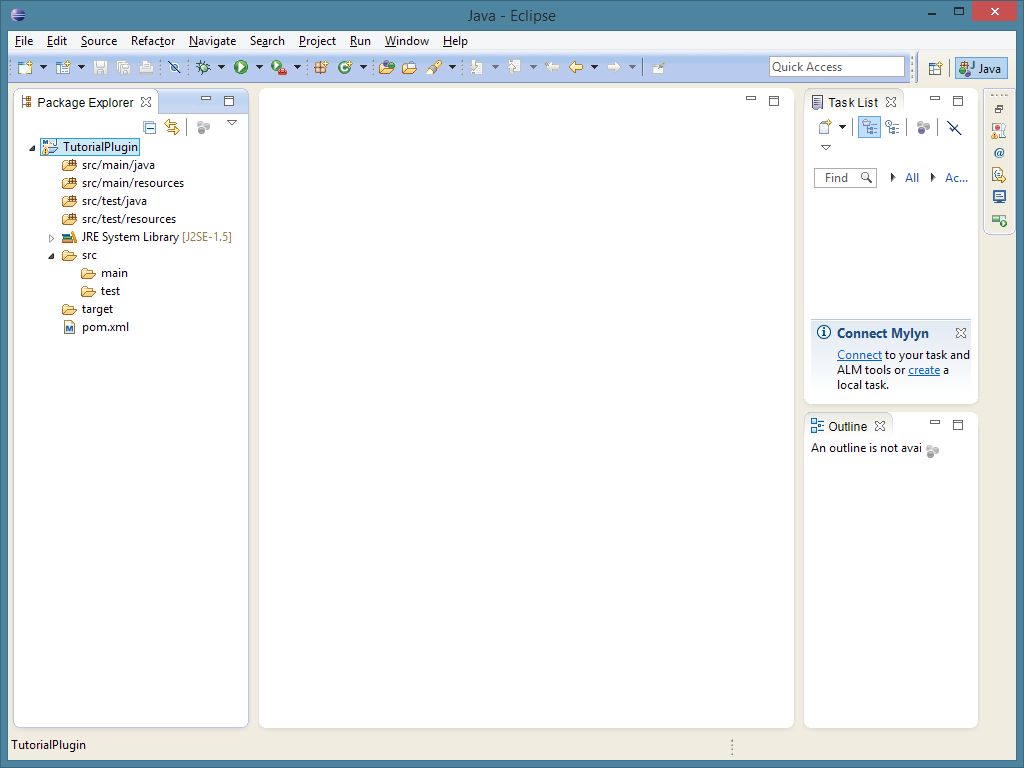
Click the arrow to the left of your artifact name, and permit's get started!
Reference the Bukkit API
Before you begin developing your plugin you will need to add the Bukkit API library to your project equally a dependency, yous can besides add together any other API's y'all may want to utilize.
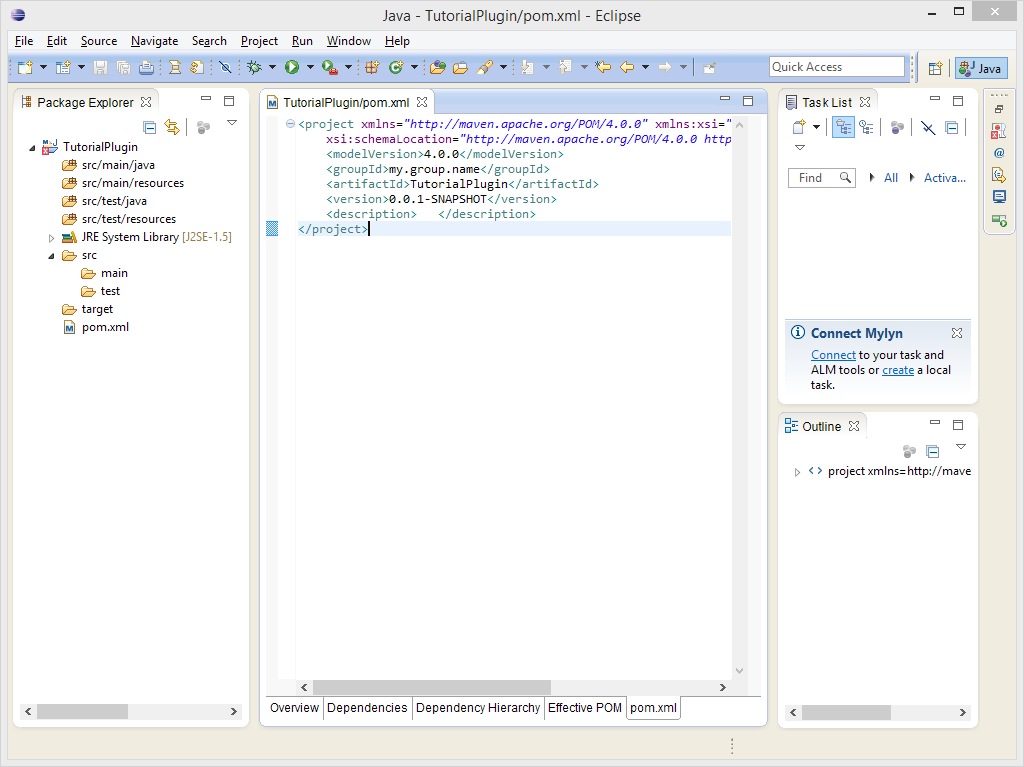
Double-click pom.xml, which is at the lesser of your project'due south folder. Click the pom.xml tab at the bottom, and you should see something similar this:
If y'all wish to utilise Coffee vi+ linguistic communication features, you must specify the Java version that the project should be built on. Copy and paste this (specifies that the project should exist built under Java 7) before </project>:
<build> <plugins> <plugin> <groupId>org.apache.maven.plugins</groupId> <artifactId>maven-compiler-plugin</artifactId> <configuration> <source>ane.7</source> <target>1.seven</target> </configuration> </plugin> </plugins> </build>
You may use other levels, such as 1.8 for Coffee 8 or 11 for Java 11. Please note that according to BStats, a sizeable number of servers run Coffee viii (~64% equally of April 2021), so compiling for Coffee 11 will outcome in many server owners being unable to run your plugin. If you lot practise apply Java 1.eight or xi features, Eclipse volition suggest changing the linguistic communication level when you hover over the code "error". Do and so.
Before the </project> at the bottom, copy and paste this block (it tells Eclipse where Bukkit'southward repository is located):
<repositories> <repository> <id>spigot-repo</id> <url>https://hub.spigotmc.org/nexus/content/repositories/public/</url> </repository> </repositories>
The spigot repository is the only working repository as the former repository "bukkit-repo" (http://repo.bukkit.org/content/groups/public/) is down.
Side by side, before the </project> at the bottom, copy and paste this block (information technology tells Eclipse that we're building against Bukkit):
<dependencies> <dependency> <groupId>org.spigotmc</groupId> <artifactId>spigot-api</artifactId> <version>i.16.5-R0.ane-SNAPSHOT</version><!--modify this value depending on the version or use LATEST--> <blazon>jar</type> <scope>provided</scope> </dependency> </dependencies>
Previously yous needed build confronting bukkit, nonetheless bukkit artifacts are no longer distributed at spigot with 1.16.
If you wish to, you may alter the version of Bukkit you're building against. Yous can view the available versions here.
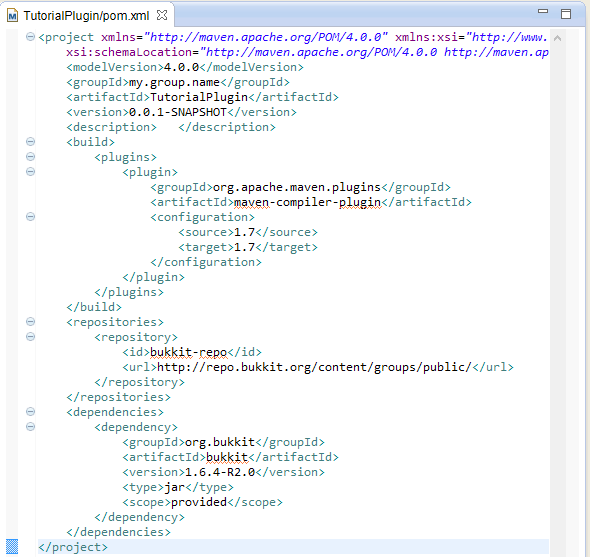
When you finish, your pom.xml should wait similar to this:
Save your pom.xml using File -> Save or pressing Cmd + Southward. It will take a few minutes to download the dependencies and build the workspace. And then, right click the projects championship and click Maven -> Update Projection.
Bukkit Javadocs
If you take some experience with Eclipse and Java you will know that when you hover your mouse over any built in class or method a xanthous box will popular upwards, containing the documentation for that class or method. This is known as a Javadoc and can too exist accessed online at the Oracle website. Bukkit also has documentation which often contains useful descriptions of each method and course provided by the API, which is available here (Beta Javadocs tin can be found here, and evolution build Javadocs here). In order to accept this information available inside Eclipse, then that information technology will pop up whenever you hover over a Bukkit method or class, beginning right click on the Bukkit jar where information technology appears nether "Maven Dependencies" in the project explorer, and select "Backdrop". Cull the Javadoc Location item on the left of the window that pops upwardly, and paste the url https://hub.spigotmc.org/javadocs/spigot/ (or that of the beta/development Javadocs linked above) into the textbox nether "Javadoc URL". It should look like this (with the new url):
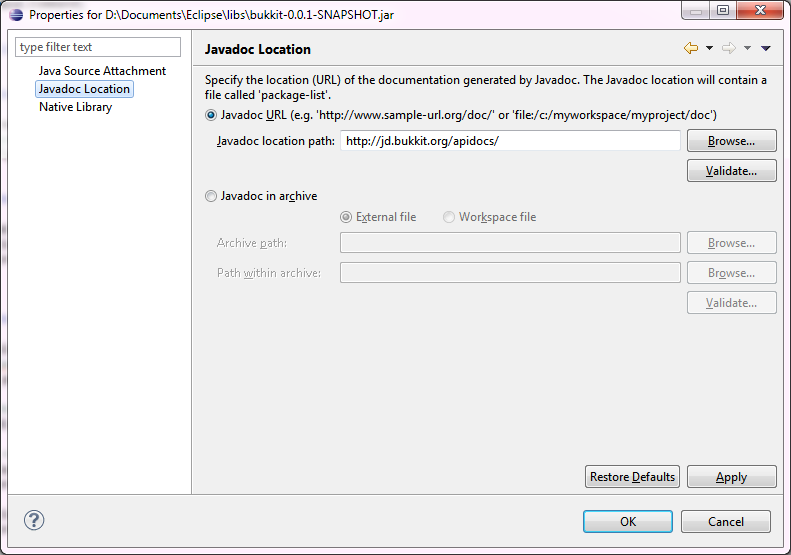
Click "Validate", and then click "OK". Washed! Now the Bukkit Javadocs are linked to the Bukkit source, and you tin can access helpful documentation from within Eclipse.
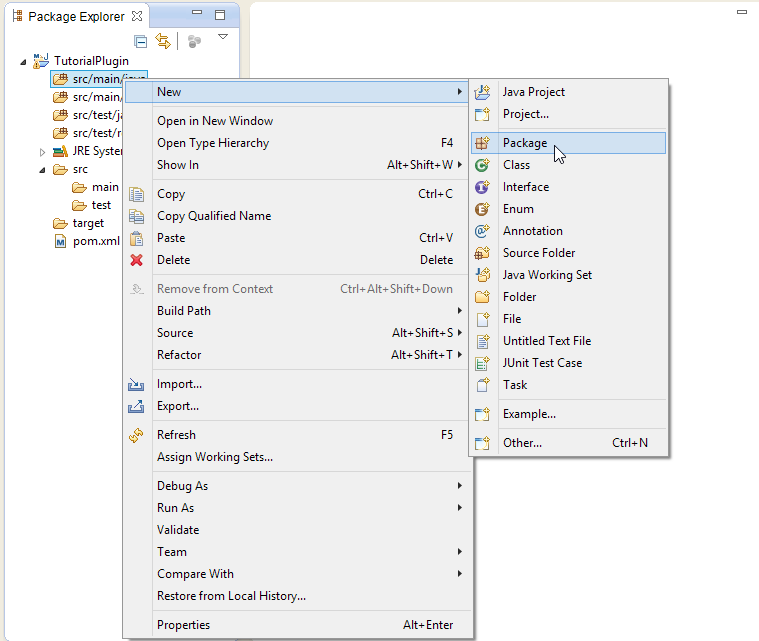
Creating a package
Now you lot need to create a 'package' which will shop all the Coffee class files we will be using. Correct click on the binder labelled src/main/coffee and select New > Package:
For your package name, put your grouping proper name, and then a menstruum, and then your artifact proper name in lowercase. For instance, if your group proper noun is io.github.proper noun and your antiquity name is TestPlugin, your package name would exist io.github.proper noun.testplugin.
Creating the Plugin'due south Class
At present that we have our project set up nosotros can starting time to add together class files and brainstorm making our plugin. The plugin's main course is the class that extends JavaPlugin. There should but ever be one class in your plugin that extends JavaPlugin either directly or indirectly. It's e'er skilful practice to create your primary form first and give it the aforementioned proper name as your plugin. Right click on the package you created before, and select New > Class. You should have a new course similar to the following
package {$ GroupName }.{ $ArtifactName }; import org.bukkit.plugin.java.JavaPlugin ; public terminal class { $ArtifactName } extends JavaPlugin { }
| | Plugins should never invoke their constructors and create new instances |
Creating plugin.yml
Now you have setup the project and the main class. To allow Bukkit to load your plugin, you must create the plugin.yml file. This file volition comprise essential information, and without it your plugin will Non piece of work. This time nosotros want to right click on src/main/resources (Alert: Sometimes having your plugin.yml here could cause errors when you endeavor to run your plugin, if this is the case attempt placing the plugin.yml directly in the project folder and not inside any src or other folders. This depends on your IDE and surround.). Select New > File. (If y'all don't encounter File as an option, select Other > General > File.) Name the file "plugin.yml" and click terminate. Eclipse will open your currently blank plugin.yml file in the default text editor. A window may open letting y'all know editors are available on the Marketplace. Installing one is unnecessary, since .yml files are unproblematic text files. (Hint: If you desire to keep your workspace organized, close the text editor and drag the plugin.yml file onto the principal workspace(To the right) and you will be able to edit the file inside Eclipse.)
There are 3 essential attributes that must be declared in the plugin.yml.
- proper name: the elementary name of your plugin.
- main: fully qualified name of the plugin's principal grade.
- version: the version cord of your plugin.
The almost simple plugin.yml file would await similar this :
name : { $PluginName } chief : { $PackageName } .{$MainClass} version : { $VersionNumber }
-
 Annotation: The package name for plugins oft includes the plugin name so don't be surprised to come across <pluginname>.<pluginname> at the end of the second line!
 - Note: Your primary class may or may not be the name of your plugin depending on what you named it earlier, continue in mind this is example-sensitive.
For more examples, see #Example_Files_and_Templates
At this betoken your plugin tin exist loaded past Bukkit, and will be accompanied with log entries indicating this. But, information technology will practise nada!
onEnable() and onDisable()
These methods are chosen whenever the plugin is enabled and disabled. By default your plugin will automatically enable itself when loaded so y'all tin annals your events and provide some debug output here. onEnable() is invoked when the plugin is enabled, and should contain logic to set up your plugin when it is enabled. onDisable() is invoked when a plugin is disabled, and should contain logic to clean up your plugin and associated state. Additionally plugins can override the onLoad() method to perform additional logic when the plugin loads.
Introduction to onEnable() and onDisable()
Create the methods onEnable() and onDisable() within the main grade created in the previous section. It will wait something similar the following
parcel {$ TopLevelDomain }.{ $Domain }.{ $PluginName }; import org.bukkit.plugin.java.JavaPlugin ; public final course { $PluginName } extends JavaPlugin { @Override public void onEnable () { // TODO Insert logic to exist performed when the plugin is enabled } @Override public void onDisable () { // TODO Insert logic to be performed when the plugin is disabled } }
The methods now be, but they don't do annihilation yet. Notation: There is no reason to print a message such as "{$PluginName} has been enabled!" as bukkit volition do this automatically. For more than information about events, click hither.
Logging a bulletin
A plugin can print a message to the console and the server log. It tin accomplish this by invoking the correct method from the plugin'due south logger. Beginning we must invoke the getLogger() method to call back the logger associate with this plugin. Then we can start logging.
We will write to the log when onEnable() method is called. Nosotros can do that by inserting the following line into the onEnable() method.
getLogger (). info ( "onEnable has been invoked!" );
You tin so do the same inside onDisable() , making sure to alter the message.
Your main course should now look something like this:
package {$ TopLevelDomain }.{ $Domain }.{ $PluginName }; import org.bukkit.plugin.java.JavaPlugin ; public final class { $PluginName } extends JavaPlugin { @Override public void onEnable () { getLogger (). info ( "onEnable has been invoked!" ); } @Override public void onDisable () { getLogger (). info ( "onDisable has been invoked!" ); } }
Handling Reloads
It is important to remember that this does not only occur on server shutdown and startup, your plugin can as well exist disabled and enabled by other plugins or through use of the /reload command while the server is running. Assuming that the server has but simply been started when the plugin is enabled is therefore a dangerous assumption, as there may well already be players online, additional worlds loaded, additional chunks loaded, and many other unexpected differences.
For example:
- You take a plugin that stores information about a histrion in a HashMap on the PlayerJoinEvent
- You rely on having that information available for every role player
- An operator uses the /reload command
- Your plugin is disabled and all data stored is lost
- Your plugin is enabled again with several players already online
- These players do non accept any information stored for them in the HashMap
- You try to remember information virtually them but there is none!
For this to work correctly on reload, you would need to find all players currently online during onEnable and shop the correct information for that histrion in the HashMap.
for ( Player player : Bukkit . getServer (). getOnlinePlayers ()) { playerList . put ( role player . getName (), playerData ( player )); }
Listeners
Listeners are classes whose methods are invoked in response to an result. All listeners implement org.bukkit.event.Listener. For farther details nearly creating listeners,
-
- Delight See: Consequence API Reference
Commands
The onCommand() Method
And then, you now know how to annals events and do something when they happen, simply what if you simply desire something to happen when a command is typed? Y'all use onCommand . This code is run whenever a player types a command preceded by the "/" grapheme. East.g. typing "/do something" would call the onCommand method. In this example nothing would happen because no behavior has been programmed.
Avoid using command names that are the same as those that come with Bukkit, and also consider carefully how unique your commands names will be. E.g. the "requite" control is already used past several plugins, and if you implement yet another "give" command, your plugin volition become incompatible with those other plugins. You must register your commands in the plugin's plugin.yml or they will not trigger this method.
The onCommand method must always return a boolean value - either true or simulated. If the value returned is true then you won't come across whatever noticeable events. However if information technology returns fake and so the plugin will revert to your plugin files' 'usage: property' and display a message to the user showing them how to use the control as specified in the plugin.yml file.
When using onCommand , y'all should always register four parameters.
-
CommandSender sender- who sent the command
-
Command cmd- the command that was executed
-
String commandLabel- the command allonym that was used
-
String[] args- an array of additional arguments, due east.1000. typing /howdy abc def would put abc in args[0], and def in args[ane]
Setting up the control
@Override public boolean onCommand ( CommandSender sender , Command cmd , String label , String [] args ) { if ( cmd . getName (). equalsIgnoreCase ( "basic" )) { // If the player typed /basic and then do the following, note: If y'all simply registered this executor for one command, you don't need this // doSomething return true ; } //If this has happened the function will return truthful. // If this hasn't happened the value of false will be returned. return false ; }
When coding the onCommand function information technology is always good practise to return faux at the very end of the office. Returning simulated will display the usage dialog ready in plugin.yml (encounter below). This way if annihilation goes wrong the assist bulletin will be displayed. When returning a value the function will leave and so if you return truthful any code underneath won't be run, unless a return statement is nested in an if argument or similar.
The .equalsIgnoreCase("basic") merely means that information technology won't distinguish between upper and lower case characters. For example, the string "Bones" and "BasiC" would both equal basic and the code would exist executed.
Press Cmd-Shift-O (Organize Imports), importing org.bukkit.command.Command , not org.bukkit.textile.Command (this is the control block), or add these ii lines at the top of your file:
import org.bukkit.command.Command ; import org.bukkit.control.CommandSender ;
Adding your Command to the Plugin.yml
You lot volition likewise need to add the command to your plugin.yml file. Add the following to the terminate of plugin.yml:
proper name : Bones main : <main package>.<principal class> version : 1.0 author : <your IGN or name> commands : basic : description : This is a demo command. usage : /<command> [thespian] permission : <plugin proper noun>.basic permission-message : You don't have <permission>
-
basic- the proper noun of the control.
-
clarification- the description of the command .
-
usage- the help dialog that users volition see when you lot return false in theonCommandmethod. Write clearly, and then that others can discern what the command is and how to apply it.
-
permission- This is used by some assistance plugins to work out which commands to evidence to the user.
-
permission-bulletin- This is output when the thespian attempts but does not have permission to use the command.
Note that yml files apply 2 spaces for tabs, as the tab character will crusade issues.
Console Commands vs. Player Commands
You may have noticed the CommandSender sender parameter above. CommandSender is a Bukkit interface which has two useful (for plugin writers) subclasses: Player and ConsoleCommandSender . (There are also other subclasses that are less common such equally BlockCommandSender )
When you're writing your plugin, it'southward a very good thought to ensure that commands that can be run from the console really work, and that commands that should only be run as a logged-in player really are only run as a logged-in player. Some plugins merely return if the sender is non a player (i.east. someone tried to apply the plugin's commands from the console), even when those commands make perfect sense from the panel (e.chiliad. changing the weather on the server).
One way to do this is:
@Override public boolean onCommand ( CommandSender sender , Control cmd , String characterization , String [] args ) { if ( cmd . getName (). equalsIgnoreCase ( "basic" )) { // If the thespian typed /basic then do the following... // do something... return true ; } else if ( cmd . getName (). equalsIgnoreCase ( "basic2" )) { if ( ! ( sender instanceof Player )) { sender . sendMessage ( "This command can only be run by a player." ); } else { Player player = ( Player ) sender ; // do something } return true ; } return false ; }
In this case, the control bones can be run by anyone - a logged-in player, or the server operator on the console. Simply the command basic2 can simply be run by logged-in players.
In general, you should permit as many commands equally possible to work on both the console and for players. Commands that need a logged-in player tin use the mechanism in the case above to check that the CommandSender is actually a player earlier continuing. Such commands would generally depend on some attribute of the actor, e.g. a teleportation control needs a player to teleport, an detail giving control needs a role player to give the detail to...
If you desire to become more than advanced, you could exercise some extra checks on your command arguments so that due east.thousand. a teleportation command could be used from the console if and only if a player's proper noun is also supplied.
Using a separate CommandExecutor class
The examples in a higher place only put the onCommand() method into the plugin'due south primary class. For minor plugins, this is fine, merely if you're writing something more extensive, it may make sense to put your onCommand() method into its ain class. Fortunately, this isn't likewise hard:
- Create a new class inside your plugin'south package. Call it something like MyPluginCommandExecutor (although of grade replacing MyPlugin with your plugin's actual name). That class must implement the Bukkit CommandExecutor interface.
- In your plugin's
onEnable()method, you need to create an instance of your new command executor class, and then make a call likegetCommand("basic").setExecutor(myExecutor);, where "basic" is the command we want to handle, andmyExecutoris the instance we created.
Best explained past example:
MyPlugin.coffee (the main plugin class):
@Override public void onEnable () { // This will throw a NullPointerException if you lot don't take the command defined in your plugin.yml file! this . getCommand ( "bones" ). setExecutor ( new MyPluginCommandExecutor ( this )); }
MyPluginCommandExecutor.java:
public class MyPluginCommandExecutor implements CommandExecutor { individual final MyPlugin plugin ; public MyPluginCommandExecutor ( MyPlugin plugin ) { this . plugin = plugin ; // Store the plugin in situations where you need it. } @Override public boolean onCommand ( CommandSender sender , Command cmd , String label , String [] args ) { // implementation exactly as before... } }
Notice how we send a reference of the main plugin object to MyPluginCommandExecutor. This allows usa easy access to the main plugin objects's methods if we demand to.
By doing this, we tin improve organise our lawmaking - if the master onCommand() method is large and complex, it tin exist split into submethods without cluttering up the plugin's principal class.
Note that if your plugin has multiple commands, y'all will demand set up the command executor for each command individually.
Writing a safety onCommand
When writing an onCommand, it'south important that you lot don't assume any information, such as the sender beingness a Actor. Things to keep in heed:
Make sure the sender is a Player earlier casting
Using simple lawmaking like this makes it possible:
@Override public boolean onCommand ( CommandSender sender , Command cmd , String label , String [] args ) { if ( sender instanceof Player ) { Player player = ( Actor ) sender ; // exercise something } else { sender . sendMessage ( "You must exist a player!" ); return false ; } // do something render faux ; }
Check the arguments length
Don't e'er presume the sender typed the correct amount of arguments.
@Override public boolean onCommand ( CommandSender sender , Command cmd , String characterization , String [] args ) { if ( args . length > 4 ) { sender . sendMessage ( "Too many arguments!" ); return fake ; } if ( args . length < 2 ) { sender . sendMessage ( "Non plenty arguments!" ); return simulated ; } }
Check if a Player is online before getting them
Sometimes you lot desire to become another player by the name entered by the histrion. Ever brand certain the role player is online!
@Override public boolean onCommand ( CommandSender sender , Command cmd , Cord characterization , String [] args ) { Player target = ( Bukkit . getServer (). getPlayer ( args [ 0 ] )); if ( target == null ) { sender . sendMessage ( args [ 0 ] + " is not online!" ); return false ; } return false ; }
If you lot need to modify a Player currently not online, the OfflinePlayer class provides basic manipulation methods.
Plugin Configuration/Settings
The Bukkit API provides a convenient mode for plugins to manage user configurable settings. Additionally it too serves as an easy way to shop data.
-
- Please see: Configuration API Reference
Permissions
If you are looking for how to Develop a permissions plugin, refer to http://wiki.bukkit.org/Developing_a_permissions_plugin
With the new Bukkit API for permissions, they couldn't be easier. To find out if a player has a particular permission use the following:
if ( player . hasPermission ( "some.pointless.permission" )) { //Do something } else { //Do something else }
You lot can too find if a permission has been prepare or not (equivalent to Coffee's cipher) with the following function:
boolean isPermissionSet ( Cord name )
You may be wondering why at that place aren't whatsoever groups. The answer to that is because they aren't really needed. Previously one of the main uses for groups was to format chat messages. That however can be done just as easily with permissions. Inside your chat plugin'due south config yous would define associations between permissions and prefixes. For example the permission "someChat.prefix.admin" would represent to the prefix [Admin]. Whenever a thespian speaks with that permission their proper name volition be prefixed with [Admin].
Another common usage might be to send a message to all users within a group. Again however this can be done with permissions with the following:
for ( Actor actor : Bukkit . getServer (). getOnlinePlayers ()) { if ( player . hasPermission ( "send.receive.bulletin" )) { player . sendMessage ( "You were sent a bulletin" ); } }
Finally you lot may be asking, well how do I set and organise player's permissions if in that location are no groups? Although the bukkit API doesn't provide groups itself, you must install a permission provider plugin such as permissionsBukkit to manage the groups for you. This API provides the interface, not the implementation.
Configuring your permissions
If yous want more than control over your permissions, for instance default values or children so you lot should consider adding them to your plugin.yml. This is completely optional, however it is advised. Below is an example permissions config that would be appended to the terminate of your existing plugin.yml:
permissions : doorman.* : description : Gives access to all doorman commands children : doorman.kick : true doorman.ban : true doorman.knock : truthful doorman.denied : false doorman.boot : description : Allows you lot to kick a user default : op doorman.ban : clarification : Allows you to ban a user default : op doorman.knock : description : Knocks on the door! default : true doorman.denied : clarification : Prevents this user from entering the door
Firstly, each permission your plugin uses is divers as a child node of the permissions node. Each permission can and then optionally accept a description, a default value, and children.
Defaults
By default when a permission isn't defined for a histrionhasPermission will render imitation. Inside your plugin.yml you can change this by setting the default node to be one of four values:
- true - The permission will be true by default.
- false - The permission volition past faux past default.
- op - If the histrion is an op so this will be true.
- not op - If the actor is non an op and then this will be true.
Children
Before at present y'all will probably be used to the * permission to automatically assign all sub permissions. This has inverse with the bukkit API and you tin can now define the child permissions. This allows for a lot more flexibility. Below is an instance of how you lot do this:
permissions : doorman.* : clarification : Gives access to all doorman commands children : doorman.kick : true doorman.ban : true doorman.knock : true doorman.denied : false
Here the doorman.* permission has several kid permissions assigned to it. The manner child permissions work is when doorman.* is gear up to truthful, the child permissions are set to their values defined in the plugin.yml. If however doorman.* was set to faux then all kid permissions would exist inverted.
Setting your own permissions
If you lot wish to know nearly developing your own permissions plugins (Ones that actually set permissions) and so check out the tutorial on Developing a permissions plugin.
Scheduling Tasks and Groundwork Tasks
Currently, Minecraft servers operate nearly all of the game logic in 1 thread, so each individual chore that happens in the game needs to be kept very short. A complicated slice of code in your plugin has the potential to cause huge delays and lag spikes to the game logic, if not handled properly.
Luckily, Bukkit has support for scheduling code in your plugin. You tin submit a Runnable chore to occur one time in the future, or on a recurring footing, or you can spin off a whole new contained thread that can perform lengthy tasks in parallel with the game logic.
At that place is a separate Scheduler Programming tutorial which introduces the Scheduler, and gives more data on using it to schedule synchronous tasks, and on boot off asynchronous tasks in Bukkit.
Cake Manipulation
The easiest way to create blocks is to get an existing block and modify it. For example, if you want to change the block that is located five blocks above y'all, you would showtime have to go your current location, add 5 to your current y-coordinate, then change it. For instance:
@EventHandler public void onPlayerMove ( PlayerMoveEvent event ) { // Go the player's location. Location loc = upshot . getPlayer (). getLocation (); // Sets loc to 5 higher up where it used to be. Note that this doesn't change the thespian'southward position. loc . setY ( loc . getY () + 5 ); // Gets the block at the new location. Block b = loc . getBlock (); // Sets the cake to blazon id 1 (stone). b . setType ( Material . Rock ); }
The in a higher place lawmaking gets the player'due south location, gets the block v blocks above the player, and sets it to stone. Notation that once you lot have a Block, there are other things you can practise as well set its type. Consult the JavaDocs for more information.
Y'all can use a similar concept to generate buildings and individual blocks programmatically through the use of algorithms. For instance, to generate a solid cube, yous could utilize nested for loops to loop over an entire cube and fill it in.
public void generateCube ( Location loc , int length ) { // Set ane corner of the cube to the given location. // Uses getBlockN() instead of getN() to avert casting to an int later. int x1 = loc . getBlockX (); int y1 = loc . getBlockY (); int z1 = loc . getBlockZ (); // Figure out the opposite corner of the cube by taking the corner and adding length to all coordinates. int x2 = x1 + length ; int y2 = y1 + length ; int z2 = z1 + length ; World world = loc . getWorld (); // Loop over the cube in the x dimension. for ( int xPoint = x1 ; xPoint <= x2 ; xPoint ++ ) { // Loop over the cube in the y dimension. for ( int yPoint = y1 ; yPoint <= y2 ; yPoint ++ ) { // Loop over the cube in the z dimension. for ( int zPoint = z1 ; zPoint <= z2 ; zPoint ++ ) { // Get the block that we are currently looping over. Block currentBlock = earth . getBlockAt ( xPoint , yPoint , zPoint ); // Set the block to blazon 57 (Diamond block!) currentBlock . setType ( Material . DIAMOND_BLOCK ); } } } }
This method will construct a 3D cube or cuboid with the given length and starting indicate. As for deleting blocks simply follow the aforementioned method for creating them merely gear up the ID to 0 (air).
(Player) Inventory Manipulation
This section mostly covers player inventory manipulation, only the same applies to chest inventory manipulation as well if you notice out how to get a chest'south inventory :P. Hither is a unproblematic example of inventory manipulation:
@EventHandler public void onPlayerJoin ( PlayerJoinEvent evt ) { Player player = evt . getPlayer (); // The histrion who joined PlayerInventory inventory = histrion . getInventory (); // The player's inventory ItemStack itemstack = new ItemStack ( Material . DIAMOND , 64 ); // A stack of diamonds if ( inventory . contains ( itemstack )) { inventory . addItem ( itemstack ); // Adds a stack of diamonds to the player's inventory player . sendMessage ( "Welcome! You seem to be reeeally rich, and so nosotros gave yous some more than diamonds!" ); } }
So within onPlayerJoin nosotros starting time make a few variables to make our job easier: player, inventory and itemstack. Inventory is the player's inventory and itemstack is a ItemStack that has 64 diamonds. After that we check if the thespian's inventory contains a stack of diamonds. If the player has a stack of diamonds, nosotros give him/her another stack with inventory.addItem(itemstack) and ship a message. So inventory manipulation isn't really that hard, if we wanted we could remove the stack of diamonds by merely replacing inventory.addItem(itemstack) with inventory.remove(itemstack) and change the message a little scrap. Hopefully this helped!
Particular Manipulation
When dealing with items in the lawmaking, you use the ItemStack course for looking up and setting all data on that stack.
Enchantments
To enchant an item you must first know the Bukkit enchantments. If you lot want to enchant items that tin can't be enchanted within normal SMP, use addUnsafeEnchantment() instead of addEnchantment()
For example, to requite Sharpness ane to a stone sword:
ItemStack myItem = new ItemStack ( Material . STONE_SWORD ); //new item of item lawmaking myItem . addEnchantment ( Enchantment . DAMAGE_ALL , 1 ); //enchant the item ItemMeta
Yous can set up the display name of an item by doing this.
String myDisplayName = "Awesome Sword" ; //apply the displayname you want here ItemStack myItem = new ItemStack ( Material . DIAMOND_SWORD ); //your item ItemMeta im = myItem . getItemMeta (); //get the itemmeta of the item im . setDisplayName ( myDisplayName ); //gear up the displayname myItem . setItemMeta ( im ); //requite the item the new itemmeta You tin can likewise set the lores of an item. The lores are the minor annotations on an detail, similar "+5 assault impairment" on a stone sword.
List < String > lores = new ArrayList < String > (); lores . add ( "Example lore" ); lores . add ( "this one comes on line ii" ); ItemStack myItem = new ItemStack ( Material . DIAMOND_SWORD ); //your item ItemMeta im = myItem . getItemMeta (); //go the itemmeta of the particular once again im . setLore ( lores ); //add the lores of course myItem . setItemMeta ( im ); //requite the particular the new itemmeta Metadata
Bukkit is trying to make plugin evolution as easy as possible, then HashMaps with key of type Role player, Entity, World or fifty-fifty a Block were replaced past Metadata. Metadata is some kind of alternative to HashMap. It allows you to add custom "fields" to Players, Entities, Worlds and Blocks. These things are all members of Metadatable course(check [1])It works very merely. Everything that is Metadatable holds its own HashMap of Metadata which you have access to. That means, for instance, if you lot're creating an economy plugin, yous would demand a HashMap of Player and Bladder or Double. With Metadata, you don't take to! You just adhere to player new metadata value, and that'due south information technology!
Why to use Metadata
- Metadata is all handled by Bukkit, which makes it a very expert alternative to HashMaps.
- Metadata tin can be used to share data between plugins.
Why not employ Metadata
- Slightly more hard to go the value.
- It is not saved on shutdown (only and so once again, neither are any Maps that you create).
Getting & Setting Metadata
public void setMetadata ( Metadatable object , String cardinal , Object value , Plugin plugin ) { object . setMetadata ( key , new FixedMetadataValue ( plugin , value )); } public Object getMetadata ( Metadatable object , String primal , Plugin plugin ) { List < MetadataValue > values = object . getMetadata ( key ); for ( MetadataValue value : values ) { // Plugins are singleton objects, so using == is safety hither if ( value . getOwningPlugin () == plugin ) { return value . value (); } } return null ; } Note: If you're manipulating with numbers, booleans or strings, use convenient method to get the consequence. For example, you can employ asInt(), asString() or asBoolean() instead of value to find out the value.
Databases
Sometimes flat files aren't plenty for what your looking to practice, this is where databases come in. The near mutual database engines bachelor on Linux/Mac/Windows machines typically run on some flavor of SQL (Structured Query Language).
Software offer SQL allow yous to create databases with columns and header to identify to contents of each cell. Call back of information technology as a spreadsheet on steroids, where every column you lot set up in your database tin can enforce rules to ensure integrity. Apart from being more organised than a uncomplicated custom data file, SQL provides faster admission and better searching than apartment files.
The SQL standard helps applications similar Bukkit implement database storage for their data in a consequent way. Unfortunately, there's more than than one SQL-gear up database engine, and each has minor differences in how to configure and utilise it. Which one y'all cull may depend on your particular needs. (Some plugins even offering configurable options to connect to multiple database engines!)
SQLite
Alta189 has written a fantastic SQLite tutorial which I suggest you spotter if you lot're interested in using SQL in your plugins, included with the tutorials is a handy library yous can download and import to make using SQL easier. In one case you take watched these video tutorials I would suggest you go and acquire some SQL syntax, information technology's very straightforward and shouldn't take you lot long to option upward. SQL Tutorials @W3Schools and @1Keydata.
SQLite is great for very elementary databases, considering in that location's no server concerns to set up. Only make a few calls to create a new database and table. It'south easy to back up: just copy the whole database file in one become. SQLite is a lilliputian scrap weaker at data integrity, flexibility in data types, and it may non be something you would want to trust for huge databases of millions of rows. Merely for a new plugin in development, it's ofttimes easiest and fastest to become the SQL nuts squared abroad with SQLite, even if you "graduate" to a more server-grade database engine after.
MySQL
Another popular SQL database engine is chosen MySQL. It is closer to server-grade than SQLite, where many popular companies or websites depend on information technology for millions of webpage hits every solar day. With that security comes a picayune bit steeper learning-curve, because MySQL has more than tunable parameters and capabilities.
The coding for plugins accessing MySQL is generally the aforementioned as tiny SQLite or mega-sized Oracle, with only minor differences in syntax hither or at that place. But the administration has room to grow. You may want to set up accounts and privileges within your MySQL setup. You may want to fix SQL scripts that organize your backups and rollback to previous states.
Deploying your Plugin
Once you accept written your plugin, how exercise you get it from a collection of source files into a working jar file that tin can exist installed on a server? First, set up a CraftBukkit server on your local machine. To do this, visit the wiki page on Setting upwards a server. Next you have to export your plugin to a .jar so that yous tin run information technology on your new server. To do this in Eclipse, right-click the project and click Run as > Maven install:
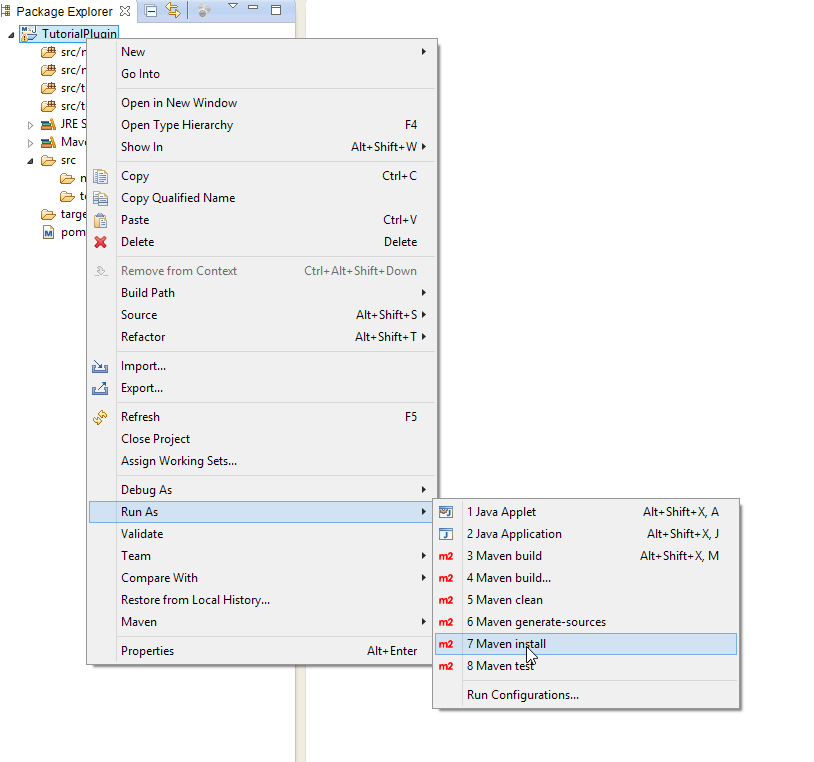
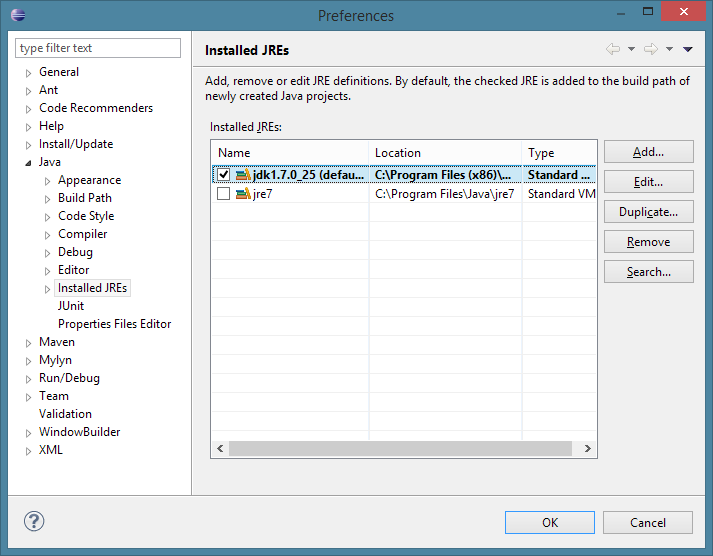
In the futurity, when y'all make code changes to your plugin, you want to delete the previous JAR by correct-clicking the project and clicking Run as > Maven make clean before doing the to a higher place. If you're having issues when building your plugin, cheque if your Java Development Kit (JDK) is properly installed and review Setting Up Your Workspace. Y'all may need to configure your JDK manually if you see a JDK-related error in the panel, as Eclipse may not have detected it correctly. Become to Window -> Preferences, and go to Java -> Installed JREs. Add together the latest JDK you've installed as a JRE, tick that 1, and untick the active one that was giving you bug:
If your projection congenital successfully, the JAR file is at present nether the target folder in your project's binder under your Eclipse workspace. The JAR file you have exported should now be a working plugin! Assuming of form that in that location are no errors in your code or your plugin.yml file. Yous tin can now drop the jar file y'all have exported into your Bukkit server's "plugins" folder, reload or relaunch the server, and test abroad! In order to connect to a server running locally on your computer, just put "localhost" as the IP address of the server in Minecraft multiplayer. If y'all run into errors that you can't solve for yourself, endeavour visiting the plugin development forum, asking in the bukkitdev IRC aqueduct, or re-reading this wiki. Once you have a useful working plugin, consider submitting your project to dev.bukkit for consumption by the Bukkit community. From the sorcerer above, you lot can see that the JAR file volition be by default a compressed archive (JARs are based on the ZIP annal format). As such, it does not make sense to put your JAR into a ZIP archive when uploading to BukkitDev and will merely increase the file size. Further, config files can be placed inside the JAR and copied into the plugin'southward data folder if the configuration file does non exist. In that location is usually no good reason for packaging JAR files into another annal.
Importing other plugins
You may wish to edit some other plugin that has the source available. If that plugin has a pom.xml in its binder (most of the popular ones, for case WorldEdit and Essentials, do), you can import it as a projection by selecting File -> Import, and and so opening the Maven folder and selecting Existing Maven Projects:
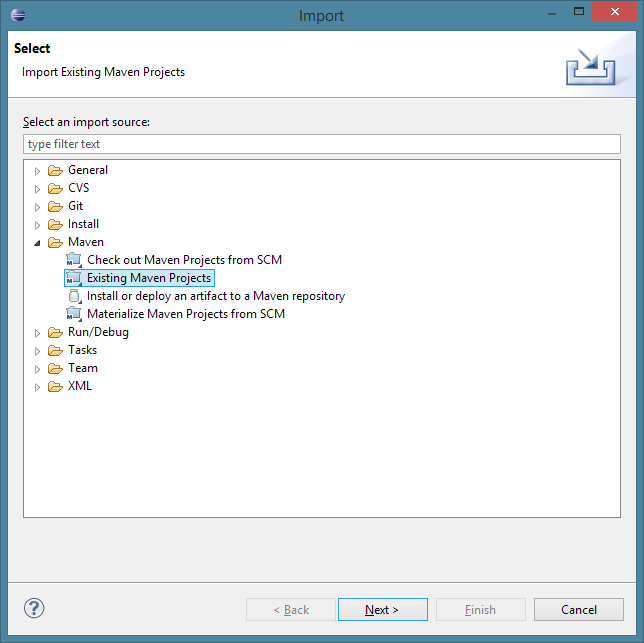
And then select the folder that the pom.xml is in, and the project should exist on your sidebar. Edit information technology and compile it like you commonly would.
Tips and Tricks
Setting a Actor on Fire
The Bukkit API is capable of a lot of absurd stuff. Here are some lawmaking snippets for some nice effects!
The following lawmaking allows a player to set another player on fire. Running a control similar /ignite Notch would cause Notch to be assault fire!
@Override public boolean onCommand ( CommandSender sender , Command cmd , String label , String [] args ) { // Uses equalsIgnoreCase() over equals() to take "ignite" and "IgNiTe." if ( cmd . getName (). equalsIgnoreCase ( "ignite" )) { // Make sure that the player specified exactly one argument (the proper noun of the player to ignite). if ( args . length != 1 ) { // When onCommand() returns faux, the help message associated with that command is displayed. render imitation ; } // Brand sure the sender is a thespian. if ( ! ( sender instanceof Role player )) { sender . sendMessage ( "Just players can set other players on fire." ); sender . sendMessage ( "This is an capricious requirement for sit-in purposes only." ); render truthful ; } // Go the player who should exist fix on fire. Remember that indecies first with 0, not 1. Player target = Bukkit . getServer (). getPlayer ( args [ 0 ] ); // Make sure the player is online. if ( target == null ) { sender . sendMessage ( args [ 0 ] + " is not currently online." ); return true ; } // Sets the role player on fire for ane,000 ticks (in that location are ~xx ticks in 2nd, so l seconds full). target . setFireTicks ( 1000 ); return true ; } return false ; } Killing the player
To keep with the theme, here's a style to kill the actor.
Use this for your onCommand method:
@Override public boolean onCommand ( CommandSender sender , Command cmd , Cord label , String [] args ) { if ( cmd . getName (). equalsIgnoreCase ( "KillPlayer" )) { Player target = sender . getServer (). getPlayer ( args [ 0 ] ); // Brand sure the player is online. if ( target == zippo ) { sender . sendMessage ( args [ 0 ] + " is not currently online." ); return true ; } target . setHealth ( 0.0D ); } return simulated ; }
Here is an extension to that, that volition impale the player with an explosion:
float explosionPower = 4F ; //This is the explosion ability - TNT explosions are 4F by default Role player target = sender . getWorld (). getPlayer ( args [ 0 ] ); target . getWorld (). createExplosion ( target . getLocation (), explosionPower ); target . setHealth ( 0.0D );
Creating a Simulated Explosion
This code produces the TNT/Creeper Visual and Audio effects. Withal, no explosion harm is dealt to surrounding entities or blocks. This is useful for nerfing explosions while nonetheless keeping the aesthetics of them.
@EventHandler public void onExplosionPrime ( ExplosionPrimeEvent event ) { Entity entity = event . getEntity (); // If the event is about primed TNT (TNT that is about to explode), and then do something if ( entity instanceof TNTPrimed ) { entity . getWorld (). createExplosion ( entity . getLocation (), 0 ); } }
Hiding a Player From Another Role player
This will hide the player who used this control from a specified player. Everyone else will be able to see the actor.
@Override public boolean onCommand ( CommandSender sender , Control cmd , Cord characterization , Cord [] args ) { if ( cmd . getName (). equalsIgnoreCase ( "HideMe" ) && args . length == ane ) { if ( ! ( sender instanceof Player )) { sender . sendMessage ( "Only players can utilize this control!" ); render true ; } // Later checking to make certain that the sender is a Thespian, we tin can safely bandage it to one. Player south = ( Actor ) sender ; // Gets the actor who shouldn't meet the sender. //Note: getPlayer(cord) is now deprecated, use getPlayer(UUID.fromString(string) instead. Player target = Bukkit . getServer (). getPlayer ( UUID . fromString ( args [ 0 ] )); if ( target == null ) { sender . sendMessage ( "Actor " + args [ 0 ] + " is non online." ); render true ; } // Hides a given Player (s) from someone (target). target . hidePlayer ( southward ); return true ; } render false ; } Spawn Lightning Commodities Where Player is Looking
The code below allows any player with a angling rod to create a lightning strike by clicking (and aiming somewhere). It'southward a simple and funny trick.
@EventHandler public void onPlayerInteractBlock ( PlayerInteractEvent event ) { Player role player = event . getPlayer (); if ( player . getItemInHand (). getType () == Material . FISHING_ROD ) { // Creates a commodities of lightning at a given location. In this case, that location is where the histrion is looking. // Tin can simply create lightning upwards to 200 blocks away. role player . getWorld (). strikeLightning ( histrion . getTargetBlock (( Ready < Fabric > ) null , 200 ). getLocation ()); } } Automatically formatting your code
Eclipse provides functionality to automatically format your code to Oracle conventions, fixing anarchistic indentations, spacing, and such. Simply select your project in the sidebar, so select Source -> Format.
Asking Section
http://forums.bukkit.org/forums/plugin-requests.13/
Example Files and Templates
- Bukkit/SamplePlugin on GitHub
- Case.Java
- ExamplePlayerListener.Java
- ExampleBlockListener.Java
- ExampleEntityListener.Java
- Core Java
If you accept any more questions on this thing, don't hesitate to visit the BukkitDev IRC channel and ask!
| Language | English language • беларуская • Deutsch • español • suomi • français • italiano • 한국어 • Nederlands • norsk • polski • português • русский • lietuvių • čeština |
|---|
Source: https://bukkit.fandom.com/wiki/Plugin_Tutorial_(Eclipse)
0 Response to "Simple Easy Java Plugins to Make for Minecraft"
Post a Comment